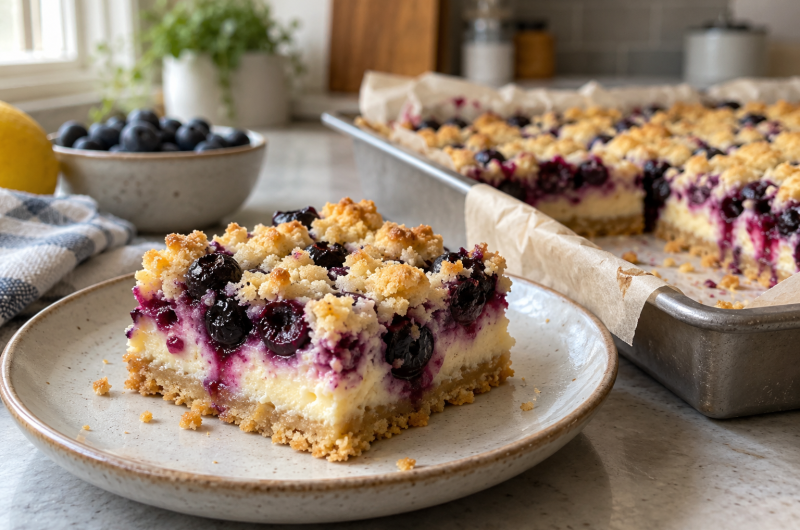
Gluten-free blueberry cheesecake bars bring together several delicious dessert textures in one easy recipe. They feature a crisp lemon shortbread base, a smooth vanilla cheesecake filling, plenty of fresh blueberries, and a golden shortbread crumble topping. Every bite delivers a balanced combination of buttery richness, bright citrus, creamy cheesecake, and sweet blueberry flavor.
These homemade blueberry cheesecake bars are suitable for family desserts, afternoon tea, celebrations, holidays, bake sales, and summer gatherings. The colorful layers also give the bars an attractive appearance without requiring frosting or complicated decorating. Unlike a traditional cheesecake, this recipe does not require a springform pan, food processor, water bath, or special baking equipment.
The shortbread crust and crumble topping are prepared from the same dough. About two-thirds of the dough forms the bottom crust, while the remaining third is crumbled over the blueberries. This simple approach reduces preparation work and creates a consistent buttery lemon flavor throughout the dessert.
Why This Gluten-Free Blueberry Dessert Works
The appeal of these gluten-free blueberry cheesecake bars comes from the contrast between the different layers. The shortbread base is strong enough to support the filling but remains tender when bitten. The cheesecake center is rich, creamy, and smooth, while the fresh blueberries provide juicy pockets of natural fruit flavor.
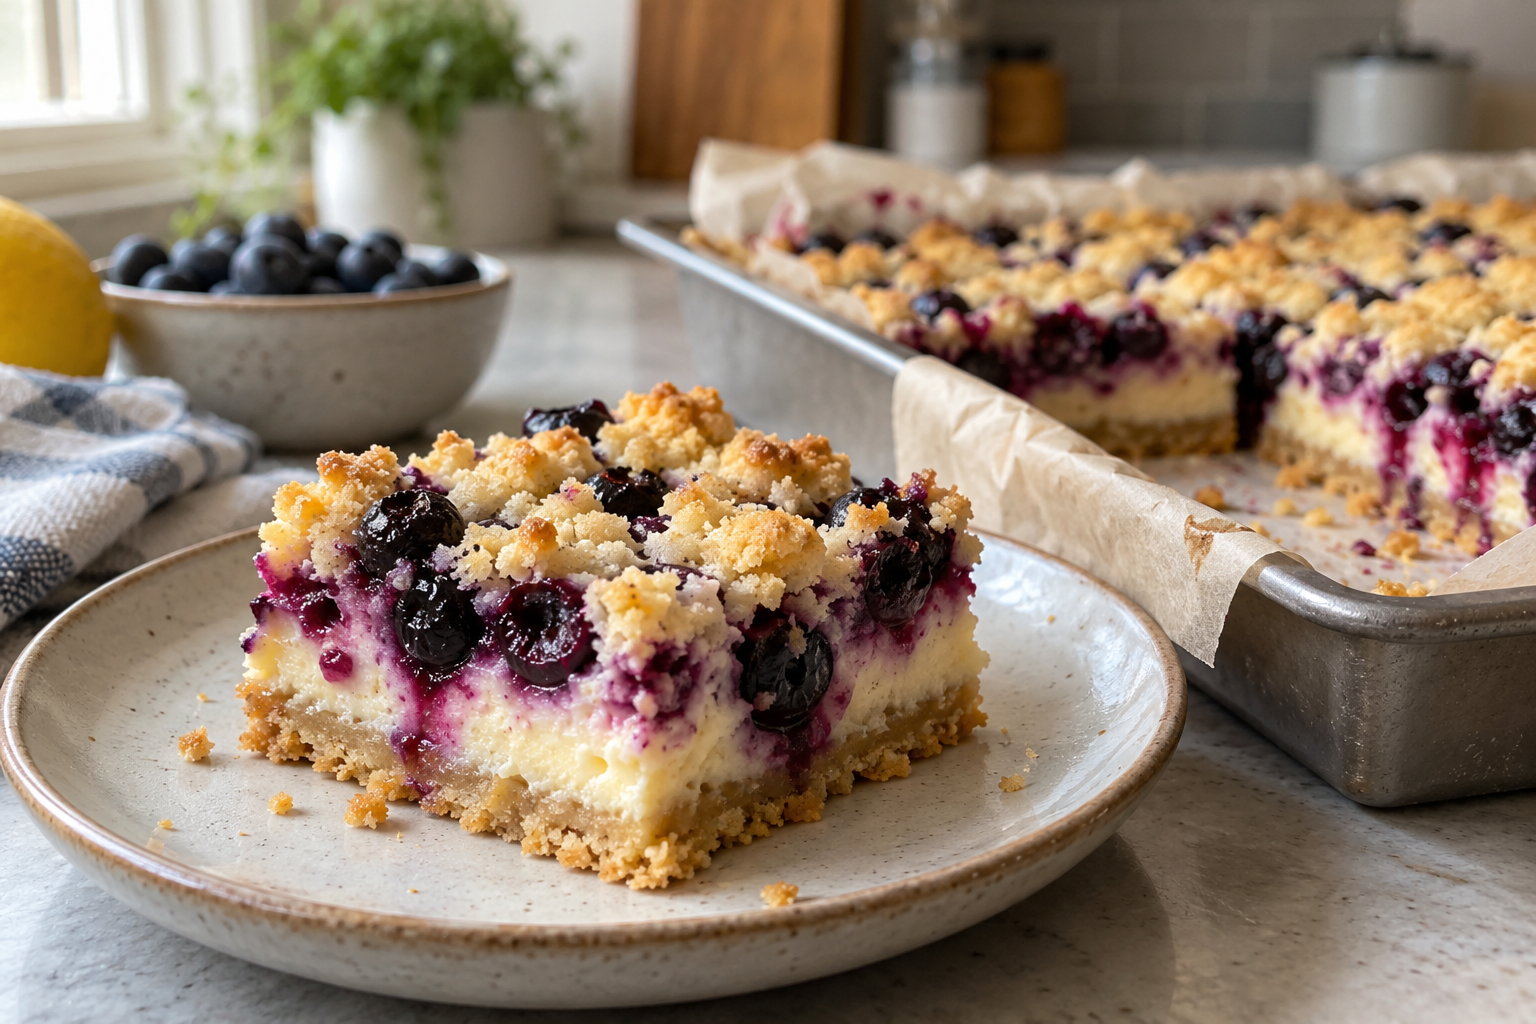
The shortbread crumble adds a golden and lightly crisp finish. Some blueberries and cheesecake remain visible between the crumble pieces, giving the dessert an inviting homemade appearance. When the bars are sliced, the golden crust, pale cheesecake filling, dark blueberries, and crumbly topping form clearly visible layers.
This recipe also uses familiar ingredients and straightforward baking techniques. Plain gluten-free flour provides the main structure for the shortbread, while almond flour contributes richness and a delicate texture. Lemon zest adds freshness without introducing extra moisture. Full-fat cream cheese and yoghurt create the filling, and cornstarch helps the cheesecake set properly.
Preparing the Lemon Shortbread Dough
The shortbread preparation begins by rubbing the lemon zest into the sugar with your fingertips. This releases the natural oils from the lemon peel and distributes their fragrance throughout the sugar. Although this is a simple step, it gives the finished crust and crumble a fresher and more noticeable lemon aroma.
Softened unsalted butter and vanilla are mixed into the lemon sugar. Stir the ingredients until they are fully combined, but do not cream or whip the mixture. Adding too much air could make the baked shortbread excessively delicate and difficult to cut neatly.
In a separate bowl, combine the plain gluten-free flour blend, almond flour, xanthan gum, and salt. If the flour blend already contains xanthan gum, omit the additional half teaspoon listed in the recipe. Using more xanthan gum than needed may make the shortbread unpleasantly firm or slightly gummy.
Add the dry ingredients to the butter mixture and stir until the dough starts forming clumps. Knead it briefly until it becomes smooth and even. Because this shortbread does not contain gluten, there is no need to worry about developing too much gluten by working the dough.
Why the Recipe Contains No Raising Agents
This lemon shortbread does not use baking powder or baking soda. A good shortbread crust should remain compact and stable so that it can support the moist cheesecake filling. Raising agents could cause the base to expand, become too delicate, or break apart when the bars are sliced.
The combination of gluten-free flour, almond flour, butter, sugar, and xanthan gum provides enough structure without a chemical raising agent. The finished crust should be firm but tender rather than soft, airy, or cake-like.
Pre-Baking the Shortbread Crust
Press approximately two-thirds of the prepared dough, about 380 grams, evenly into the parchment-lined baking pan. Pay attention to the corners and edges so that the base has a consistent thickness. You may use a small offset spatula, clean hands, or the flat bottom of a measuring cup to smooth the surface.
The bottom crust must be baked separately for about 20 minutes before the cheesecake filling is added. This important step allows the shortbread to become golden and firm. If the moist filling were poured over raw dough, the crust could remain underbaked, soft, or soggy.
After pre-baking, let the shortbread cool until it is warm while you prepare the cheesecake mixture. It does not need to cool completely. Keep the oven set at 350°F or 180°C because the assembled bars will bake at the same temperature.
Preparing the Vanilla Cheesecake Filling
The creamy filling contains full-fat cream cheese, full-fat plain or Greek-style yoghurt, sugar, cornstarch, eggs, and vanilla. Full-fat dairy ingredients provide the rich flavor and stable texture expected from cheesecake. Reduced-fat alternatives may contain more water and could produce a softer or less reliable filling.
Bring the cream cheese, yoghurt, and eggs to room temperature before mixing. Ingredients at similar temperatures combine more smoothly and are less likely to create lumps. Cold cream cheese is particularly difficult to mix evenly by hand.
Gently mix the cream cheese and yoghurt with a balloon whisk until smooth. The purpose is to combine the ingredients rather than beat air into them. Excess air may expand in the oven and then collapse during cooling, affecting the surface and texture of the cheesecake.
Combine the sugar and cornstarch before adding them to the cream cheese mixture. This helps distribute the cornstarch evenly and prevents small lumps. Mix until combined, then add the eggs and vanilla. Continue mixing gently only until the filling becomes smooth.
Why Cornstarch Is Important
Cornstarch, also known as cornflour in the United Kingdom, helps stabilize the cheesecake layer. It works with the eggs to give the filling enough structure to hold its shape after baking, cooling, and chilling.
Only a small amount is needed, so the cheesecake remains creamy instead of becoming dense or rubbery. Measure it accurately because too much cornstarch may produce a heavy filling, while too little could make the bars difficult to cut.
Why Fresh Blueberries Are Recommended
Fresh blueberries are recommended because they retain their shape and release less moisture than frozen berries. The recipe uses approximately two and a half cups, giving the dessert a generous amount of blueberry flavor rather than using the fruit only as a decoration.
Some berries will remain whole, while others will soften and release purple juice into the pale cheesecake. This creates a naturally attractive appearance without requiring blueberry sauce, artificial coloring, or additional flavoring.
Frozen blueberries may release too much water as they thaw and bake. Excess liquid could soften the shortbread, loosen the cheesecake filling, and make the finished bars difficult to slice cleanly.
Wash the fresh blueberries gently and remove any stems, leaves, or damaged fruit. Dry the berries thoroughly before placing them over the filling. Water left on the surface of the berries may introduce unnecessary moisture into the cheesecake.
Assembling the Blueberry Cheesecake Bars
Pour the prepared cheesecake filling over the warm shortbread base. Spread it carefully into an even layer without pressing hard enough to damage the crust.
Scatter the fresh blueberries evenly over the cheesecake. Distribute them toward the edges and corners rather than concentrating them in the middle. This ensures that every finished serving contains a good amount of fruit.
Crumble the reserved third of the shortbread dough over the blueberries. The topping should provide fairly even coverage, but it should not hide the filling and berries completely. Leaving some fruit visible creates a more attractive finished dessert.
A mixture of small and medium crumble pieces produces the best homemade appearance. Very large pieces may not bake evenly, while extremely fine crumbs could brown too quickly.
Baking the Assembled Bars
Bake the assembled gluten-free blueberry cheesecake bars at 350°F or 180°C for approximately 40 to 45 minutes. The shortbread crumble should become golden brown, and the cheesecake filling should appear almost set.
Gently move the pan to check the center. The filling should have only a slight wobble. A small amount of movement is normal because the cheesecake will continue to set while cooling and chilling. However, the center should not appear loose or move like liquid.
If the filling remains very jiggly, continue baking for a few more minutes before checking again. Removing the bars too soon could leave the cheesecake too soft for clean slicing. Avoid excessive baking because an overbaked cheesecake may become dry rather than creamy.
Ovens can vary in temperature and baking speed, so begin checking the dessert near the lower end of the recommended time. Do not repeatedly open the oven door because sudden temperature changes may interrupt even baking.
Cooling and Chilling the Bars
Cooling and chilling are essential stages of this recipe. The cheesecake filling remains delicate when it first comes out of the oven. Leave the dessert inside the baking pan and allow it to cool completely to room temperature.
Do not lift or slice the bars while they are warm. The cheesecake could spread, the shortbread may break, and the blueberry juices may run into the other layers.
After the dessert reaches room temperature, place the pan in the refrigerator for at least two hours. Chilling firms the cheesecake, settles the fruit juices, and makes the shortbread easier to cut.
For the cleanest slices and best overall texture, refrigerate the bars overnight. The additional resting time also allows the blueberry, lemon, and vanilla flavors to blend more fully.
Cutting the Cheesecake Bars Neatly
Use the parchment paper overhang to lift the fully chilled dessert from the baking pan. Transfer the complete slab to a clean cutting board.
Use a large, sharp knife to divide the dessert into 12 bars. Wipe the blade after every cut to prevent cheesecake and blueberry juice from transferring onto the next portion.
If the filling still feels too soft, return the dessert to the refrigerator for additional chilling. Properly chilled cheesecake bars should maintain their layers without spreading or breaking apart.
Measuring Gluten-Free Flour Correctly
Gluten-free flour blends may differ considerably in weight and density. A digital kitchen scale provides the most reliable results, especially when measuring the gluten-free flour, almond flour, cream cheese, blueberries, and reserved shortbread dough.
If cups are used, avoid pressing or packing the flour into the measuring cup. Adding too much flour may make the crust and crumble dry, dense, or overly fragile.
The homemade blend mentioned in the original recipe weighs approximately 150 grams per cup, which differs from the weight of some commercial flour blends. For this reason, using the listed weight of 240 grams will provide greater accuracy.
Selecting and Preparing the Baking Pan
Use a 9-inch or 23-centimeter square baking pan. A smaller or larger pan will change the thickness of the layers and may require a different baking time.
Line the pan with parchment or baking paper, leaving enough overhang on at least two opposite sides. These parchment handles will help you lift the chilled dessert without damaging the crust or filling.
Position the oven rack in the middle. This gives the shortbread base, cheesecake filling, and crumble topping more balanced exposure to heat and reduces the risk of the bottom becoming too dark.
Serving Suggestions
These blueberry cheesecake bars have enough flavor and color to be served without any additional topping. The golden crumble, creamy filling, and deep purple berries already create an attractive presentation.
You may dust the chilled bars with powdered or icing sugar before serving, but this is optional. Serve the bars directly from the refrigerator for the firmest texture, or let them rest briefly at room temperature for a slightly softer cheesecake center.
The bars pair well with tea or coffee and can be arranged on a dessert tray for family gatherings, parties, holidays, or afternoon tea. Individual portions are also easier to distribute than slices of a traditional round cheesecake.
Storage and Make-Ahead Instructions
Store the gluten-free blueberry cheesecake bars in a closed container in the refrigerator for approximately three to four days. Refrigeration is necessary because the filling contains cream cheese, yoghurt, and eggs.
When stacking the bars, place parchment paper between the layers. This will prevent the portions from sticking together and protect the shortbread crumble.
The dessert is convenient for preparing in advance. Bake the bars the day before they are required, cool them completely, and refrigerate them overnight. Lift and slice the chilled dessert shortly before serving.
Important Notes
The finished dessert combines the creamy richness of blueberry cheesecake with the crisp and crumbly texture of lemon shortbread. The pre-baked crust remains firm beneath the filling, while the fresh blueberries provide natural sweetness, color, and juicy flavor.
Using room-temperature ingredients, fresh blueberries, a pre-baked crust, gentle mixing, and a complete chilling period will help produce attractive cheesecake bars with clearly defined layers and a balanced texture.
Gluten Free Blueberry Cheesecake Bars
These gluten-free blueberry cheesecake bars feature a crisp lemon shortbread crust, a smooth vanilla cheesecake layer, plenty of fresh blueberries, and a golden shortbread crumble.
12
servings20
minutes1
hour5
minutes425
kcal120
minutes60
minutes4
hours25
minutesIngredients
- Lemon Shortbread
125 g (½ cup + 2 tablespoons) caster, superfine, or granulated sugar
Zest of 1 lemon
140 g (1¼ sticks) unsalted butter, softened
1 teaspoon vanilla bean paste or 2 teaspoons vanilla extract
240 g (2 cups) plain gluten-free flour blend
65 g (⅔ cup) almond flour, almond meal, or finely ground almonds
½ teaspoon xanthan gum; omit if already included in the flour blend
¼ teaspoon salt
- Cheesecake Filling
450 g (2 cups/16 oz) full-fat cream cheese, room temperature
60 g (¼ cup) full-fat plain or Greek-style yoghurt, room temperature
100 g (½ cup) caster, superfine, or granulated sugar
10 g (1½ tablespoons) cornstarch or cornflour
2 large eggs, room temperature
1 teaspoon vanilla bean paste or 2 teaspoons vanilla extract
- Blueberry Layer
350 g (about 2½ cups) fresh blueberries
Directions
- Preheat the oven to 350°F (180°C). Line a 9-inch (23 cm) square pan with parchment paper.
- Rub the sugar and lemon zest together. Mix in the butter and vanilla.
- Combine the gluten-free flour, almond flour, xanthan gum, and salt separately.
- Add the dry ingredients to the butter mixture. Mix into an even dough.
- Press two-thirds of the dough, about 380 g, into the pan. Reserve the rest.
- Bake the crust for 20 minutes until golden. Let it cool until warm.
- Gently mix the cream cheese and yoghurt until smooth.
- Combine the sugar and cornstarch, then mix them into the cream cheese.
- Add the eggs and vanilla. Mix gently until smooth.
- Spread the cheesecake filling over the crust.
- Add the blueberries and crumble the reserved dough on top.
- Bake for 40–45 minutes until golden and slightly wobbly in the center.
- Cool completely, then refrigerate for at least 2 hours.
- Lift from the pan, cut into 12 bars, and serve.
Nutrition Facts
- Calories: 425kcal
- Fat: 24g
- Carbohydrates: 48g
- Protein: 6g