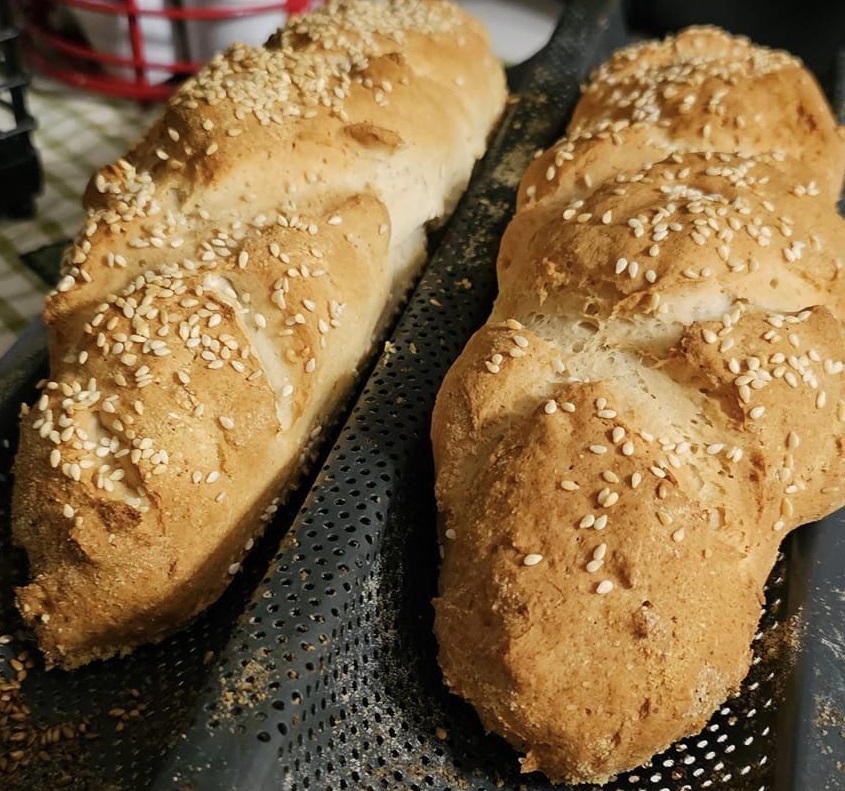
These classic loaves of gluten free French bread are just as crusty outside, soft and tender inside, as you remember. They’re even quick and easy enough to make on a weeknight!
Yield: 2 10-inch loaves
INGREDIENTS
- 1 3/4 cups (245 g) all purpose GF Flour blend (I used Better Batter)
- 3/4 teaspoon xanthan gum omit if your blend already contains it
- 1/4 cup (36 g) starch /flour plus more for sprinkling
- 2 teaspoons (6 g) instant yeast
- 1/2 teaspoon kosher salt
- 3/4 cup (6 ounces) warm water (about 95°F)
- 1 (25 g (weighed out of shell)) egg white at room temperature
- 1 tablespoon (21 g) honey
- 1 teaspoon apple cider vinegar
- 1 tablespoon (14 g) unsalted butter at room temperature
- Cooking oil spray
INSTRUCTIONS
-
In the bowl of a stand mixer fitted with the paddle attachment, place the flour, xanthan gum, tapioca starch/flour, and yeast, and whisk to combine well. Add the salt, and whisk again to combine.
-
Create a well in the center of the dry ingredients and add the water, egg white, honey, vinegar, and butter, and mix to combine.
-
Beat the mixture with the paddle attachment with the stand mixer on medium speed for about a minute. The dough will clump.
-
Increase the speed to medium-high and continue to beat until the dough begins to stick to the sides of the mixing bowl and looks “whipped” in texture. Transfer the dough to a container with a lid that seals tightly, cover, and refrigerate for at least 30 minutes and up to 3 days.
-
When you’re ready to shape the dough, turn the chilled dough out onto a flat surface lightly sprinkled with tapioca starch. Dust the top of the dough lightly with more tapioca starch, and turn it over a few times and knead it gently to smooth the dough.
-
Using a large knife or bench scraper, divide the dough into 2 equal portions.
-
Working with one piece of dough at a time, dusting very lightly with more flour as necessary to prevent sticking, shape the bread into a cylinder, pinching together any breaks in the dough to seal them.
-
Position the palms of both hands right next to one another on the top of the cylinder of dough. Roll the dough first away from your body and then back toward it as you move your hands in a half moon motion away from one another, toward the edges of the dough.
-
The shape should be thicker in the center, tapered toward the ends. See the video for a visual of shaping the dough.
-
Place the shaped rolls a couple inches apart on a parchment lined baking sheet. Cover with lightly greased plastic wrap and place in a warm, draft-free environment and allow to rise until risen to about 150% of its original size.
-
Rising will take longer in a dry, cool environment, and less time in a warm, humid environment. Do not place it in a heated oven, to any temperature, to rise, or you risk killing the yeast.
-
As the bread dough is nearing the end of its rise, preheat your oven to 475°F and position the top rack a bit higher than the center of the oven. When the rise is complete, uncover the baking sheet.
-
Using a small, sharp knife or a lame held at a 45° angle to the dough, slash each roll on top 3 times at evenly spaced spots on the dough about 1/4-inch deep. Spray the tops and sides of each roll liberally with cooking oil spray.
-
Place the baking sheet on the top oven rack, toss a few ice cubes on the floor of the oven, and quickly close the oven door.
-
Bake for 18 minutes, and rotate the baking sheet one half turn. Continue to bake for about another 5 minutes or until lightly golden brown all over and an instant read thermometer inserted into the thickest part of the roll read about 190°F.
-
For a softer crust, wrap the hot rolls in a tea towel as they cool. Allow to cool for at least 10 minutes before serving.