
These gluten free blueberry scones are deliciously moist and buttery, with crisp, caramelised edges and a soft, tender interior packed full of juicy blueberries. They’re super easy to make, and the recipe works great with both fresh and frozen berries. Keeping the dough cold and chilling the scones before baking ensures the perfect texture and prevents excessive spreading.
These are genuinely THE PERFECT gluten free blueberry scones. I love every single thing about them: they’re perfectly moist and buttery (no sad, dry scones here!!), with crisp, generously caramelised edges and a soft, tender interior. Importantly, they’re not too cakey or too crumbly – they’re just right.
They’re packed full of juicy blueberries, so you really get lots of blueberry goodness in every single bite. While some recipes use cream or milk to bind the dough together, I made these with buttermilk which adds a wonderful rich flavour with a subtle tangy undertone. And don’t skimp on the vanilla, it really brings the whole thing together. If you fancy, you could also add some lemon zest to the dough – blueberries and lemon are always a wonderful combination.
The recipe works great with both fresh and frozen blueberries, so just use whichever you have on hand (if using frozen blueberries, don’t thaw them). The chilling step will be slightly different depending on which one you use (scones with fresh berries are chilled in the fridge, those with frozen berries are chilled in the freezer) but that’s really the only difference – both versions work great and give perfect results.
These gluten free blueberry scones are super quick and easy to make. The actual active prep time is about 15 minutes, the rest of the time you’re just waiting for the scones to first chill and then bake until golden and delicious.
And while many bakers like to use grated frozen butter in their scones, this recipe uses cold, not frozen butter. That’s mainly because I *never* remember to freeze my butter in time… and honestly, the recipe works just as well with cold butter. Just make sure that your buttermilk is also cold (straight from the fridge) and that you work quite quickly. Your scone dough needs to be cold at all times, that’s what gives the scones the perfect texture and also prevents them from spreading too much during baking (that’s also why I chill them for at least 15 minutes before baking).
Now, before we get to the recipe, an important disclaimer: these are American-style scones, NOT British scones!!! These aren’t the kind of scones you’d split in half and fill with jam and clotted cream for your afternoon tea. But they sure are ridiculously delicious – so, even if you’re only familiar with British scones, I really encourage you to give these a try because holy cow they’re SO GOOD.
How to make gluten free blueberry scones
Making these blueberry scones couldn’t be easier. The important thing to keep in mind is that the scone dough needs to stay cold if you want to get the perfect scone texture and appearance. So, make sure that your butter and buttermilk are cold (straight from the fridge) and work quite quickly – don’t overwork or over-handle the dough, as that can make the butter start to melt.
To make the gluten free blueberry scone dough:
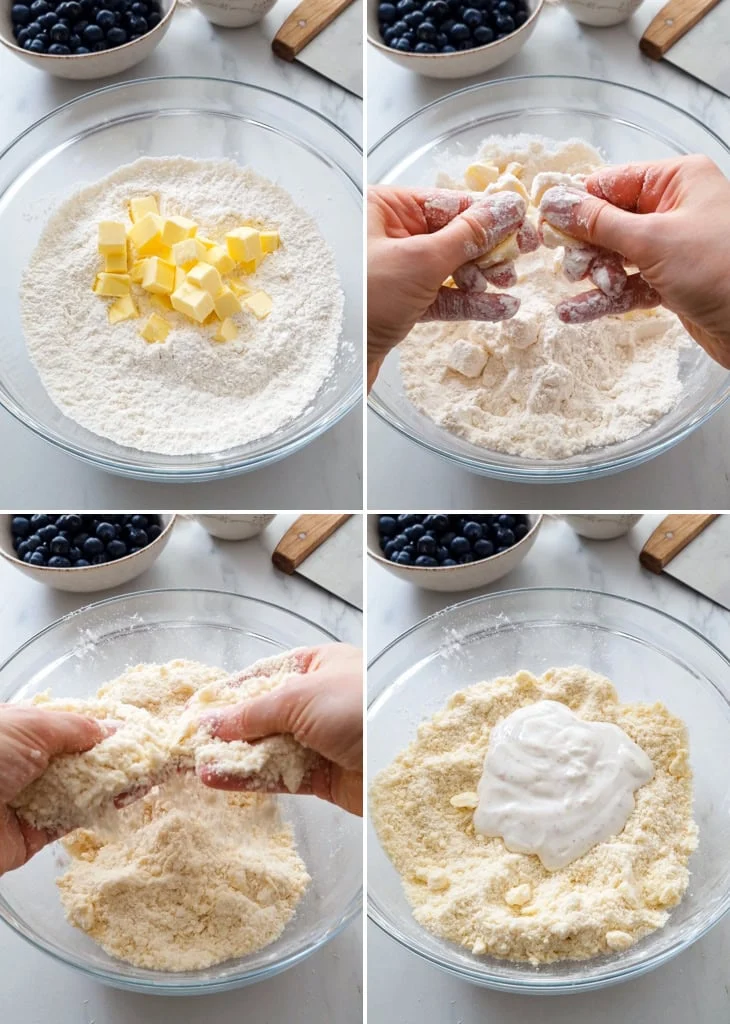
- Whisk together the dry ingredients (plain gluten free flour blend, sugar, baking powder, xanthan gum and salt).
- Add the cold cubed butter and work it into the dry ingredients until you get a mixture resembling breadcrumbs, with a few pea-sized pieces here and there.
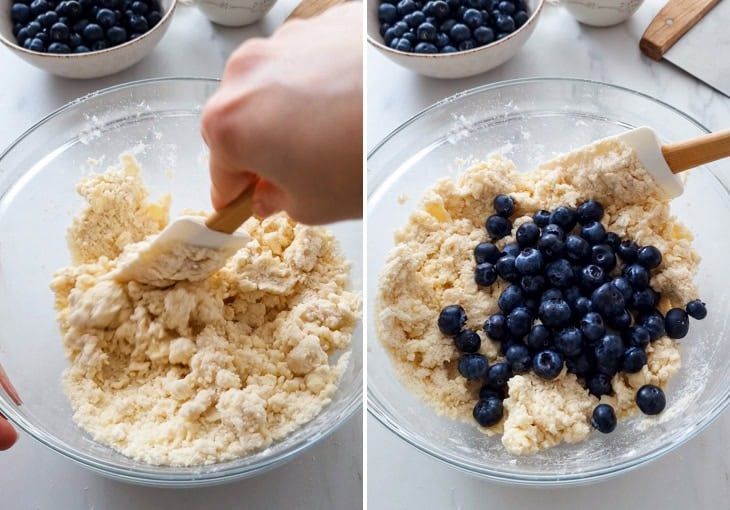
- Add the cold buttermilk and vanilla, and stir everything together until the dough starts clumping together in places but it’s still uneven with some patches of dry flour.
- Add the blueberries (either fresh or frozen, but if you’re using frozen ones, don’t thaw them) and stir well until they’re evenly distributed and most of the flour has been hydrated. Your dough will still be fairly crumbly and shaggy at this point, it shouldn’t hold together or form a ball.
To shape the scones:
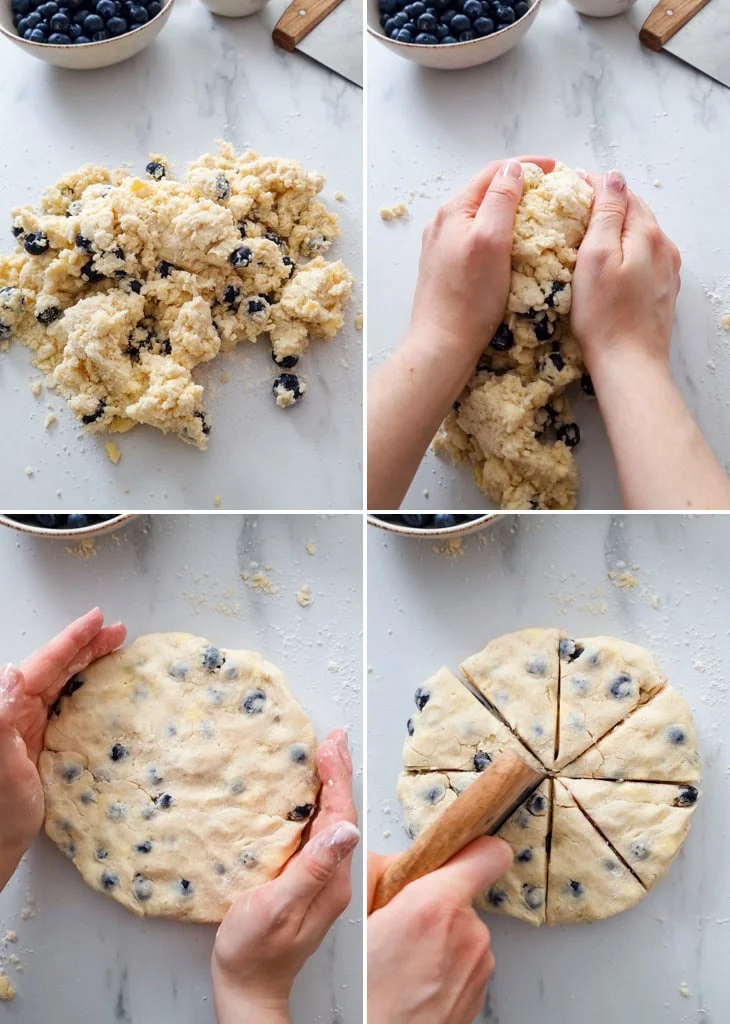
- Turn out the dough onto a lightly floured surface and use your hands to press it together into a rough ball. Be careful not to overwork it, it needs to stay as cold as possible, otherwise the butter could start to melt. You don’t need to knead it – the aim is to press it together so it won’t fall apart when you cut it into the individual scones, but it doesn’t have to be perfectly smooth. At this point, you can add a tiny bit more flour (if the dough is too sticky) or a tiny bit more buttermilk (if it’s too dry and won’t stick together).
- Press the dough into a roughly 7-inch (18cm) disc, about 1 inch (2.5 cm) thick.
- Cut it into 8 wedges, either with a sharp knife or with a straight-edged metal pastry cutter (bench scraper).
- Transfer the blueberry scones onto a lined baking sheet, cover with a sheet of plastic wrap/cling film (to prevent them from drying out) and chill for at least 15-20 minutes (in the fridge if you used fresh blueberries, in the freezer if you used frozen ones). This chilling step is really essential, as it ensures that the scones won’t spread out too much in the oven and that they’ll have the perfect texture.
To bake the gluten free blueberry scones:
- Pre-heat the oven to 400ºF (200ºC). Place the chilled scones onto a large lined baking sheet, spaced apart as far as possible, as they will puff up during baking.
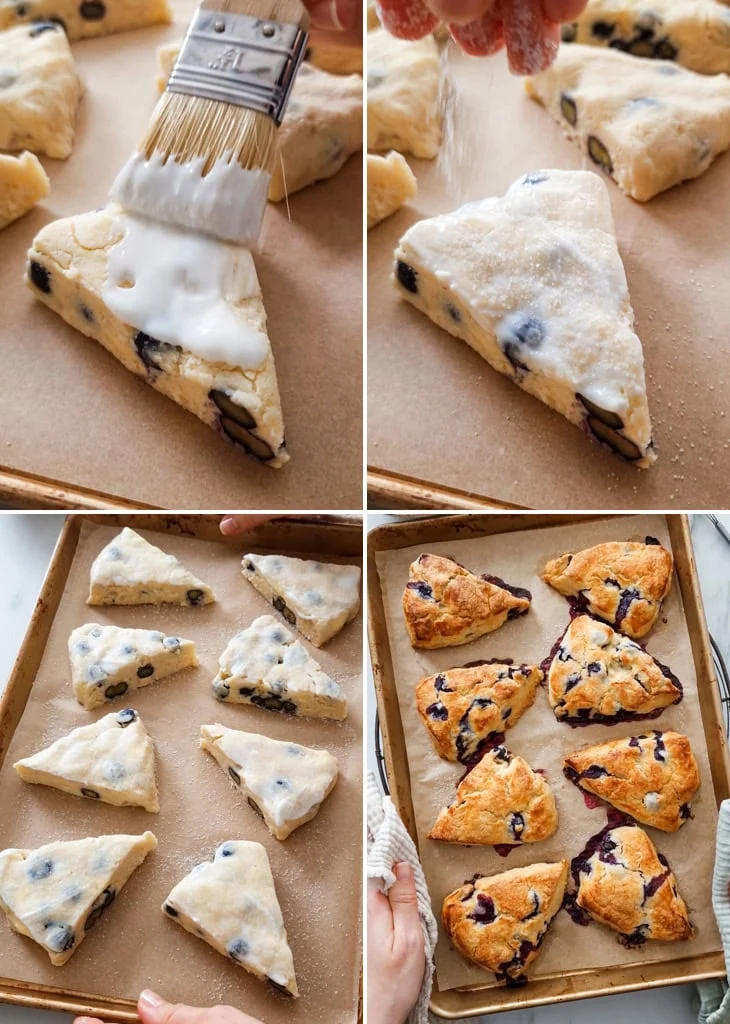
- Brush them with a bit of extra buttermilk and sprinkle with granulated sugar.
- Bake them at 400ºF (200ºC) for 20-22 minutes until golden brown on top and slightly darker around the edges.
- Once baked, cool them on the baking sheet for about 5 minutes, then transfer them to a wire rack to cool – they’re amazing both warm and cooled completely to room temperature.
Now, you can serve these as they are, or you can drizzle them with a simple icing made from powdered/icing sugar, lemon juice and vanilla. Either option is AMAZING, so just choose whichever you fancy most.
Top tips for making gluten free blueberry scones
- You can use either fresh or frozen blueberries. You’ll get the perfect result either way, so just use whichever you have on hand. But note that the chilling step (before baking) is different depending on which ones you use. If you use fresh berries, chill the scones in the fridge. If you use frozen berries, you need to freeze the scones instead.
- If using frozen blueberries: don’t thaw them, add them to the dough straight from the freezer. Make sure to work quickly and don’t handle the dough too much, as you don’t want the frozen berries to thaw and soften. Frozen blueberries will probably turn parts of your dough slightly purplish, but that usually gets “resolved” in the oven – your scones will still turn out perfectly golden and gorgeous, don’t worry.
- Use COLD butter and buttermilk (straight from the fridge). That’s absolutely essential for the texture and appearance of the scones.
- Using buttermilk in the scone dough adds richness, gives them the most amazing flavour, and keeps them moist. Because buttermilk is acidic, it also reacts with the baking powder, which gives the scones some extra rise.
- Keep the scone dough as cold as possible – don’t over-work it! Try to handle the scone dough as little as possible. If you handle and knead it too much that can warm up the butter, which will make the dough too sticky to easily cut, and it’ll make the scones spread too much in the oven.
- Chill the scones before baking (either in the fridge or freezer). That sets the butter in the dough and it prevents the scones from spreading too much during baking. If you chill them as per the recipe, they’ll come out of the oven as the prettiest, golden wedges of blueberry-packed deliciousness.
And that’s it! This covers everything you need to know about these FABULOUS gluten free blueberry scones. They’re just these little wedges of buttery, blueberry-studded deliciousness, and I seriously can’t get enough of them. The textural difference between the crisp, slightly crunchy crust and the soft, moist interior is absolutely divine.
I really hope you’ll love them as much as I do.
Easy Gluten Free Blueberry Scones
These gluten free blueberry scones are deliciously moist and buttery, with crisp, caramelised edges and a soft, tender interior packed full of juicy blueberries. They’re super easy to make, and the recipe works great with both fresh and frozen berries. Keeping the dough cold and chilling the scones before baking ensures the perfect texture and prevents excessive spreading.
Prep Time 15 minutes
Cook/Bake Time 20 minutes
Chill Time 15 minutes
Total Time 50 minutes
Servings 8 scones
Blueberry scones:
- 240 g (2 cups) plain gluten free flour blend, plus extra for flouring the surface (I used Doves Farm Freee gluten free plain white flour that doesn’t have any xanthan gum added. You can also mix your own gluten free flour blend using this recipe. Note that for this homemade blend, 1 cup = 150g, so ideally use a digital food scale and the weight measurements for best results.)
- 50 g (¼ cup) caster/superfine or granulated sugar
- 2 tsp baking powder
- ½ tsp xanthan gum (Omit if your gluten free flour blend already contains xanthan gum.)
- ¼ tsp salt
- 115 g (1 stick) cold unsalted butter, cubed
- 115 g (½ cup) cold buttermilk
- 1 tsp vanilla bean paste (or 2 tsp vanilla extract)
- 140 g (about 1 cup) fresh or frozen blueberries (If using frozen berries, don’t thaw them – use them straight from the freezer.)
You’ll also need:
- 1-2 tbsp buttermilk, for brushing the scones
- 1 tbsp granulated sugar, for sprinkling the scones
Vanilla icing:
- 60 g (½ cup) powdered/icing sugar
- 10-15 g (2-3 tsp) lemon juice
- ½ tsp vanilla bean paste (or 1 tsp vanilla extract)
Instructions
Making the scone dough:
- Note: It’s very important that the scone dough stays cold at all times if you want to get the perfect scone texture and appearance. So, make sure that your butter and buttermilk are cold (straight from the fridge) and work quite quickly – don’t overwork or over-handle the dough, as that can make the butter start to melt.
- In a large bowl, whisk together the gluten free flour blend, sugar, baking powder, xanthan gum and salt.
- Add the cold cubed butter and work it into the dry ingredients until you get a mixture resembling breadcrumbs, with a few pea-sized pieces here and there.
- Add the cold buttermilk and vanilla, and stir everything together until the dough starts clumping together in places but it’s still uneven with some patches of dry flour.
- Add the blueberries (if you’re using frozen ones, don’t thaw them!) and stir well until they’re evenly distributed and most of the flour has been hydrated. Your dough will still be fairly crumbly and shaggy at this point, it shouldn’t hold together or form a ball.
Shaping & chilling the scones:
- Turn out the dough onto a lightly floured surface and use your hands to press it together into a rough ball. Be careful not to overwork it, it needs to stay as cold as possible, otherwise the butter could start to melt. You don’t need to knead it – the aim is to press it together so it won’t fall apart when you cut it into the individual scones, but it doesn’t have to be perfectly smooth.At this point, you can add a tiny bit more flour (if the dough is too sticky) or a tiny bit more buttermilk (if it’s too dry and won’t stick together).Tip: If using frozen blueberries, make sure to work quickly and don’t handle the dough too much, as you don’t want the blueberries to thaw and soften. Frozen blueberries will probably turn parts of your dough slightly purplish, but that usually gets “resolved” in the oven – your scones will still turn out perfectly golden and gorgeous, don’t worry.
- Press the dough into a roughly 7-inch (18cm) disc, about 1 inch (2.5 cm) thick.
- Cut it into 8 wedges, either with a sharp knife or with a straight-edged metal pastry cutter (bench scraper).
- Transfer the scones onto a lined baking sheet, cover with a sheet of plastic wrap/cling film (to prevent them from drying out) and chill for at least 15-20 minutes (in the fridge if you used fresh blueberries, in the freezer if you used frozen ones).While the scones are chilling, start pre-heating the oven.Tip: This chilling step sets the butter in the dough and it prevents the scones from spreading too much during baking. This way, they’ll puff up in the oven but still retain their pretty wedge shape.
Baking the blueberry scones:
- Adjust the oven rack to the middle position, pre-heat the oven to 400ºF (200ºC) and line a large baking sheet with parchment/baking paper.Tip: I like to transfer the chilled scones onto a new, room temperature baking sheet (not the one they’ve been chilled on). That ensures that their bottoms start baking straight away and further prevents spreading.
- Place the chilled scones onto the lined baking sheet, spaced apart as far as possible, as they will puff up during baking.
- Brush them with a bit of extra buttermilk and sprinkle with granulated sugar.
- Bake them at 400ºF (200ºC) for 20-22 minutes until golden brown on top and slightly darker around the edges.
- Once baked, cool them on the baking sheet for about 5 minutes, then transfer them to a wire rack to cool – they’re amazing both warm and cooled completely to room temperature.You can serve them as they are, or drizzle them with a simple vanilla icing. To make the icing, simply mix together the powdered/icing sugar, lemon juice and vanilla until smooth (you can adjust the consistency by adding a small amount of extra powdered/icing sugar or lemon juice, as needed).
Storage:
- The gluten free blueberry scones are at their best on the day of baking, but you can store them in a closed, air-tight container in a cool, dry place for up to 2 days. I recommend reheating them before serving.You can reheat them by placing them in a 350ºF (180ºC) oven for 5-10 minutes until they’re heated through and their exterior is crisp. You can also reheat them in the microwave, by microwaving in 10-15 second bursts until they’re warm and soft. Note that reheating them in the microwave won’t crisp up the crust – but it will make their interior just as soft and tender as it was on the first day.
