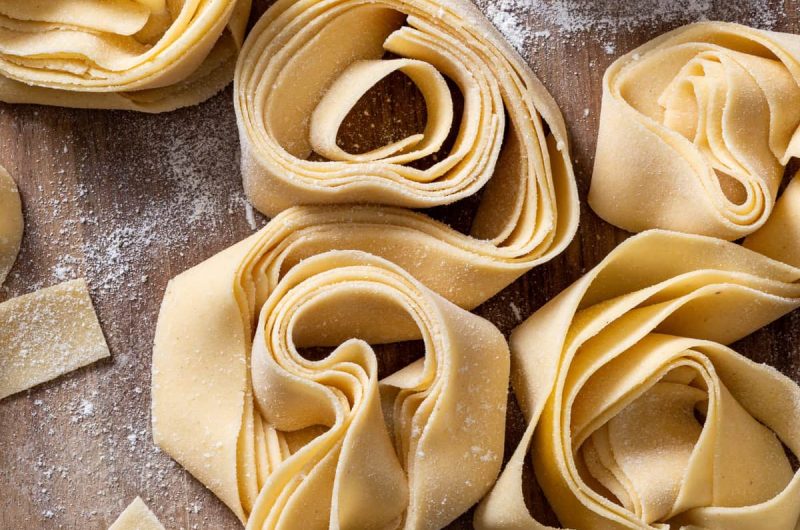
This 3-ingredient homemade gluten free pasta is a total game-changer and, once you’ve tasted it, you’ll never go back to the store-bought stuff. The dough comes together in no time and it rolls out beautifully, either by hand or using a pasta machine. You can use it to make all sorts of deliciousness: from tagliatelle and fettuccine to ravioli and lasagna.
This is my go-to gluten free pasta recipe. It’s super quick and easy to make and, importantly, it tastes like real, delicious pasta. You’d never know it’s gluten free, even non-gluten-free folks can’t tell the difference!
You need just 3 ingredients to make it, and all of them are pantry staples: a gluten free flour blend, xanthan gum and eggs. And the dough comes together in no time – you basically just need to knead everything together until you get a smooth, supple dough. That’s it!
Gluten free pasta ingredients
You need just 3 ingredients to make this gluten free pasta, and all of them are (gluten free) pantry staples:
- Gluten free flour blend. You can use either a shop-bought blend, or you can use a homemade one – whichever you prefer. I’ve tested this recipe with numerous shop-bought “1-to-1” flours as well as my own homemade blend, and it turned out perfect every single time. The important thing to keep in mind is that different gluten free flour blends absorb slightly different amounts of moisture. In practice, that means that you might need to add slightly more egg or slightly more flour to your pasta dough in order to get the perfect texture.
- Xanthan gum. This acts as a binder (gluten substitute) and it gives the gluten free pasta dough enough elasticity and flexibility so that you can roll it out until it’s fairly thin, and also so you can use it for things like ravioli, tortellini or cappelletti. Without the xanthan gum, the dough would crumble, crack and tear when you try to roll it out, so you really can’t leave it out. You can read more about xanthan gum here!
- Eggs. The eggs bind the dough together: the egg yolks give the pasta its richness, and the egg whites add even more elasticity. The base recipe uses 3 US large/UK medium eggs – but, depending on your gluten free flour blend (and how much moisture it absorbs), you might need to add a tiny bit more egg, just to get the correct dough consistency.
If you wish, you can also add a small amount (½ tablespoon) of oil to the pasta dough. That makes it even smoother, but it’s definitely an optional ingredient.
Making the gluten free pasta dough
To make the gluten free pasta dough:
- Whisk together the gluten free flour blend and xanthan gum.
- Make a well in the middle of the dry ingredients and add the eggs.
- Mix everything together into a shaggy dough.
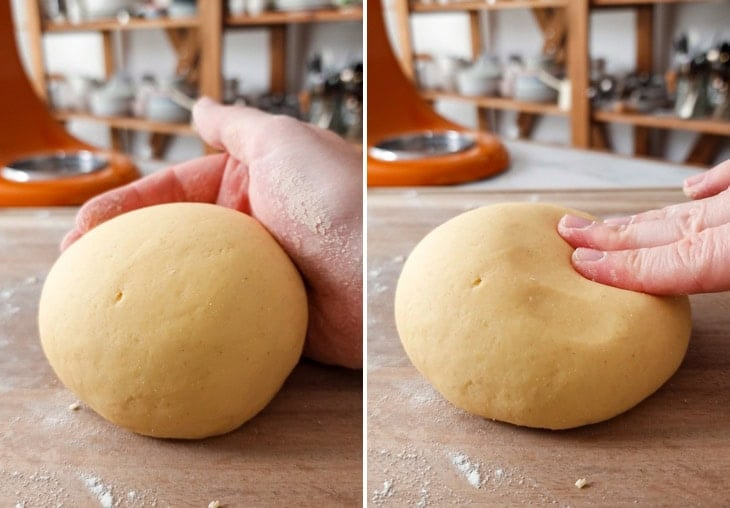
- Turn it out onto a lightly floured surface and knead it for 2-3 minutes, until you get a smooth, supple dough. (Because this is a gluten free pasta dough, there’s no gluten to “develop” – but kneading ensures a smooth dough with no flour clumps.) The final pasta dough should be fairly firm but not too dry. It should form a smooth ball without cracking or crumbling. It also shouldn’t be sticky to the touch.
- At this point, you can add a small amount of extra flour or extra egg to achieve the correct dough texture, if needed.

How to roll out gluten free pasta
This recipe makes four “nests” of tagliatelle or fettuccine, so cut the dough into four equal pieces. You’ll be working with one piece at a time, so wrap the other pieces in plastic wrap/cling film (or cover them with a damp tea towel) to prevent them from drying out.
You can roll out the pasta either with a pasta roller/pasta machine or by hand, using a rolling pin. I used the pasta roller attachment on my KitchenAid stand mixer (so all thickness settings refer to that).
The first part of the rolling process is all about getting the rolled-out pasta dough as smooth as possible:
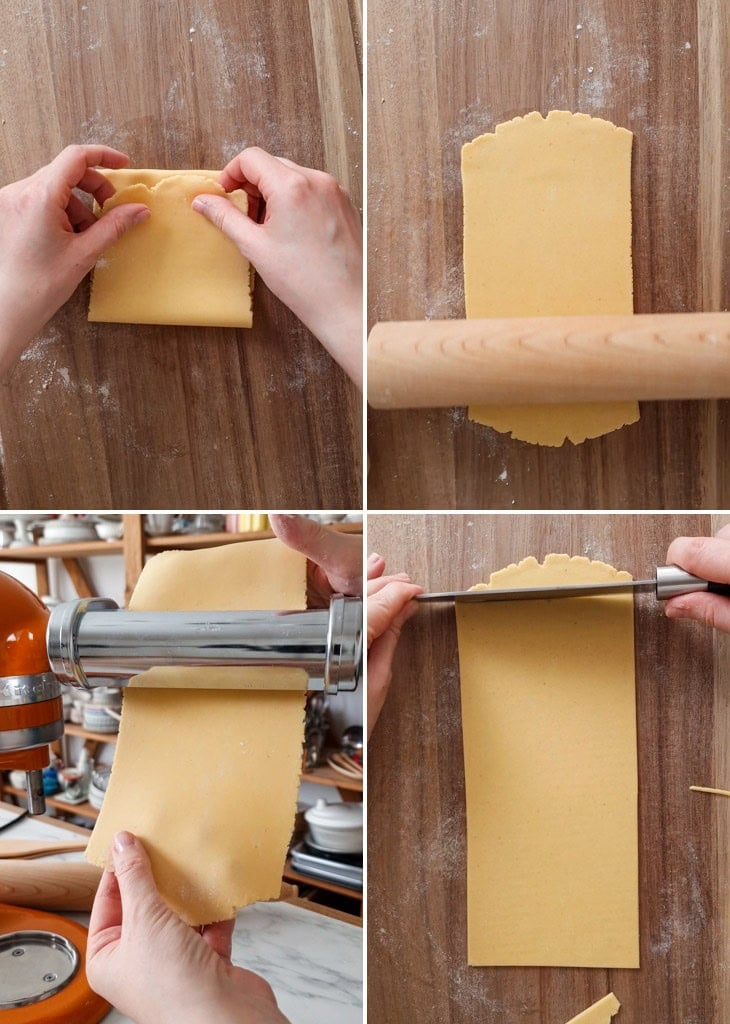
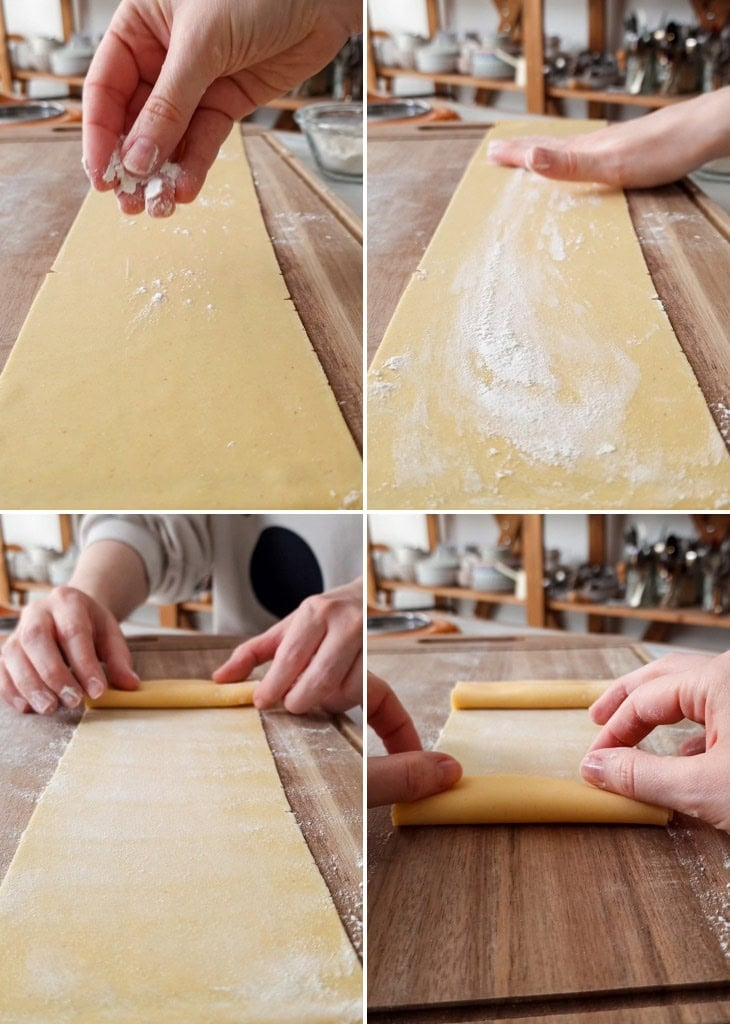
- Take one portion of the gluten free pasta dough and roll it out, on a lightly floured surface with a rolling pin, into a long oval or a rough rectangle.
- Fold it into thirds, like you would a letter, rotate it by 90 degrees (so the “open ends” face towards and away from you) and roll it out again into a long rectangle. Make sure it’s only slightly thicker than the widest setting on your pasta machine – this ensures it’ll go through smoothly.
- Pass the pasta dough rectangle through the pasta machine on the widest setting (1 on the KitchenAid pasta roller).
- Fold the pasta sheet into thirds again, rotate it by 90 degrees and roll it out again, with a rolling pin, into a long rectangle. Make sure it’s only slightly thicker than the widest setting on your pasta machine.
- Pass the pasta dough rectangle through the pasta machine on the widest setting (1 on the KitchenAid pasta roller). This should give you a smooth sheet of pasta, but the edges might be slightly craggy, with a few small cracks here or there.
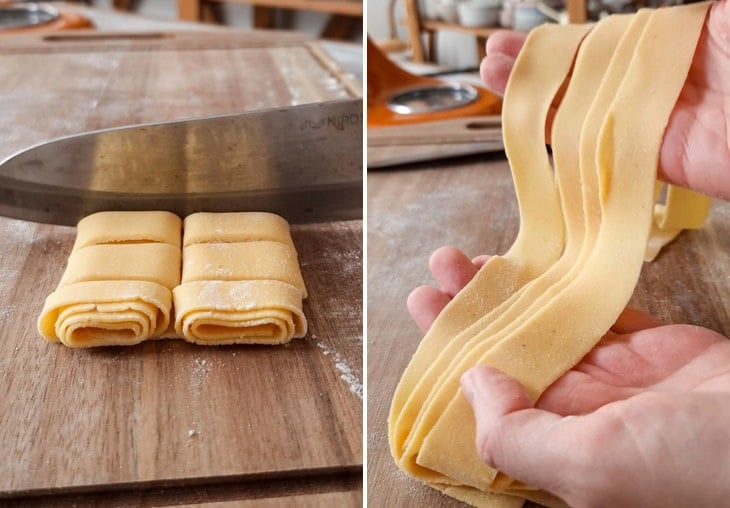
- You can use a sharp knife or a pizza cutter to cut away the craggy edges, to get a perfectly neat sheet of pasta.

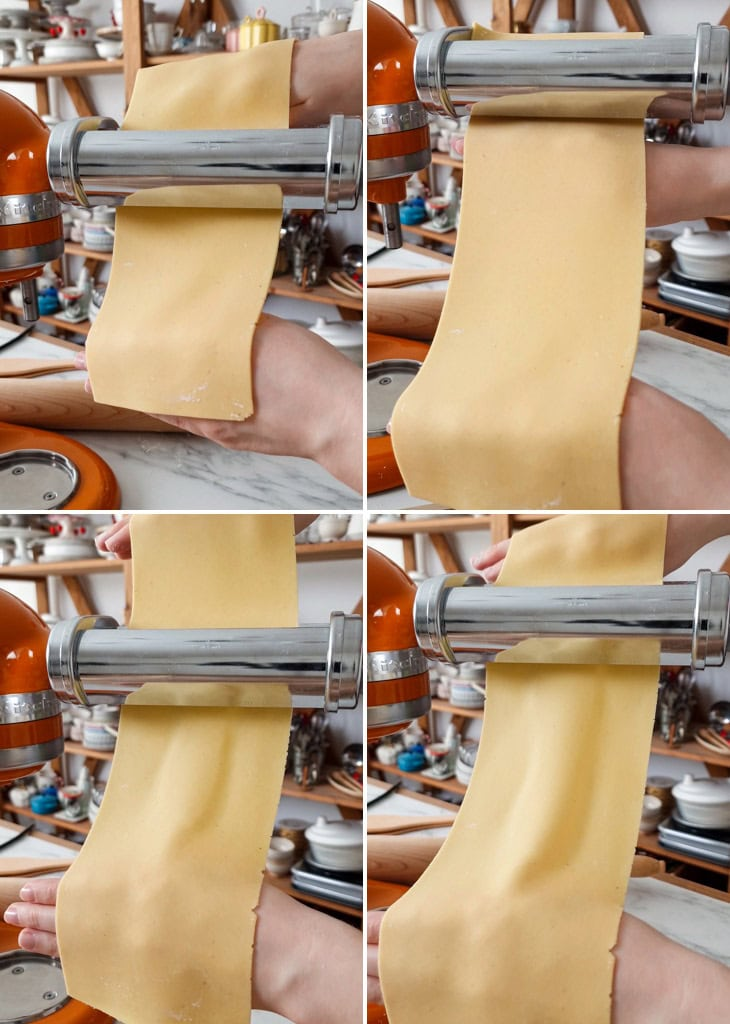
The point of all of this is to get a smooth, velvety and neat sheet of gluten free pasta that’s now ready to be rolled out to the desired thickness. To do this, pass the pasta sheet TWICE through the next narrower setting (2 on the KitchenAid pasta roller), then TWICE through the next narrower setting, and so on until you reach the desired thickness. You can lightly dust the pasta sheet with flour as needed while you’re rolling it. Passing the pasta sheet through each setting twice ensures that it’ll be perfectly smooth and even.
My final (narrowest) setting is usually 4 on the KitchenAid pasta roller attachment for things like fettuccine or tagliatelle, or 5 if I want it to be slightly thinner – for example, if I want to make ravioli or tortellini.
Finally, note that because this is *gluten free* pasta and it doesn’t have the same degree of elasticity as regular pasta made from wheat flour, you might find that there’s a tiny crack on the edge of your pasta sheet here or there. It shouldn’t be anything major – and definitely nothing that threatens the “structural integrity” of your pasta – so don’t stress about it! It’s meant to look homemade and a bit rustic, so embrace the imperfections.
Cutting and shaping gluten free pasta
All that’s left to do now is decide on the shape. For beginner pasta makers, I recommend something easy like pappardelle, tagliatelle or fettuccine. Especially if it’s your first time making homemade gluten free pasta, you don’t want to experiment too much with pasta shapes. Start simple and work your way up.
You can use a knife or the cutting setting on your pasta machine, either option works great. Once it’s cut, dust your pasta with some extra flour (to prevent it from sticking together) and shape it into nests.
You can use the pasta immediately or store it for later (more on that below). If you’re cooking it straight away, you just need to toss it into some boiling hot water with a generous pinch of salt, and within 5 minutes or so you’ll have a steaming plate of gluten free pasta that tastes just like the “regular” gluten-containing stuff.
Storing gluten free pasta
If you don’t plan on cooking and eating the gluten free pasta straight away, you can store it as follows:
- In the fridge for up to one day. Make sure that your pasta is generously dusted with flour, to prevent it from sticking to itself, place it into an airtight container, and store it in the fridge.
- In the freezer for up to one month. Make sure that your pasta is generously dusted with flour, to prevent it from sticking to itself. Arrange the pasta on a lightly floured baking sheet, in a single layer, and freeze it for 1 hour until hardened. Then, transfer it to a freezer (Ziplock) bag and store in the freezer. It’ll usually take about 1-2 minutes longer to cook frozen pasta.
While you might want to dry your homemade pasta, a word of caution: this pasta dough contains a lot of eggs (and therefore a lot of moisture), and improperly dried and stored pasta can quickly become mouldy. That’s why I recommend either cooking the pasta straight away or storing it in the fridge or freezer.
And that’s it! This covers everything you need to know about this AMAZING homemade gluten free pasta recipe. It really is incredibly quick and easy to whip up, and it most certainly tastes (and feels and looks) just like “regular” pasta made from wheat flour. And I can 100% confirm that it’s way, way better than the shop-bought stuff. 😉
I really hope you’ll love it as much as I do.
Homemade Gluten Free Pasta
This 3-ingredient homemade gluten free pasta is a total game-changer and, once you’ve tasted it, you’ll never go back to the store-bought stuff. The dough comes together in no time and it rolls out beautifully, either by hand or using a pasta machine. You can use it to make all sorts of deliciousness: from tagliatelle and fettuccine to ravioli and lasagna.
The recipe makes four 2½ oz (70 g) nests of gluten free tagliatelle or pappardelle, which should feed 2-4 people, depending on how hungry they are.
Ingredients
- 200 g (1⅔ cups) plain gluten free flour blend, plus extra for kneading and dusting the pasta (I used Doves Farm Freee gluten free plain white flour that doesn’t have any xanthan gum added. You can also mix your own gluten free flour blend using this recipe. Note that for this homemade blend, 1 cup = 150g, so ideally use a digital food scale and the weight measurements for best results.)
- 1 tsp xanthan gum (If your gluten free flour blend already contains xanthan gum, add only ½ teaspoon.)
- 3 US large/UK medium eggs (You might need to add slightly more egg depending on your gluten free flour blend, more details below.)
- ½ tbsp olive oil, optional (The oil makes the pasta dough even smoother, but it’s definitely an optional ingredient.)
Instructions
Making the pasta dough:
- Whisk together the gluten free flour blend and xanthan gum.
- Make a well in the middle of the dry ingredients and add the eggs (and olive oil, if you wish). Mix everything together into a shaggy dough.
- Turn it out onto a lightly floured surface and knead it for 2-3 minutes, until you get a smooth, supple dough. Because this is a gluten free pasta dough, there’s no gluten to “develop” – but kneading ensures a smooth dough with no flour clumps.The final pasta dough should be fairly firm but not too dry. It should form a smooth ball without cracking or crumbling. It also shouldn’t be sticky to the touch. (See blog post for photos.)
- At this point, you can add a small amount of extra flour or extra egg to achieve the correct dough texture, if needed.If the dough doesn’t come together in a ball and feels crumbly or dry (this can happen if your gluten free flour blend absorbs a lot of moisture), you can add some extra egg – whisk up a whole egg, and then add it slowly until you reach the correct dough consistency.If, on the other hand, the dough feels too wet or soft, you can add a small amount of additional flour.
Rolling out the pasta dough:
- I recommend having a look at the step-by-step photos in the blog post before you start rolling out your pasta.
- Divide the pasta dough into four equal pieces. You’ll be working with one piece at a time, so wrap the other pieces in plastic wrap/cling film (or cover them with a damp tea towel) to prevent them from drying out.
- You can roll out the pasta either with a pasta roller/pasta machine or by hand, using a rolling pin. I used the pasta roller attachment on my KitchenAid stand mixer (so all thickness settings refer to that).
- Take one portion of the gluten free pasta dough and roll it out, on a lightly floured surface with a rolling pin, into a long oval or a rough rectangle. Fold it into thirds, like you would a letter, rotate it by 90 degrees (so the “open ends” face towards and away from you) and roll it out again into a long rectangle. Make sure it’s only slightly thicker than the widest setting on your pasta machine – this ensures it’ll go through smoothly.
- Pass the pasta dough rectangle through the pasta machine on the widest setting (1 on the KitchenAid pasta roller).
- Fold the pasta sheet into thirds again, rotate it by 90 degrees and roll it out again, with a rolling pin, into a long rectangle. Make sure it’s only slightly thicker than the widest setting on your pasta machine.
- Pass the pasta dough rectangle through the pasta machine on the widest setting (1 on the KitchenAid pasta roller). This should give you a smooth sheet of pasta, but the edges might be slightly craggy, with a few small cracks here or there. You can use a sharp knife or a pizza cutter to cut away the craggy edges, to get a perfectly neat sheet of pasta.
- You should now have a smooth, velvety and neat sheet of gluten free pasta that’s ready to be rolled out to the desired thickness.To do this, pass the pasta sheet TWICE through the next narrower setting (2 on the KitchenAid pasta roller), then TWICE through the next narrower setting, and so on until you reach the desired thickness. You can lightly dust the pasta sheet with flour as needed while you’re rolling it. Passing the pasta sheet through each setting twice ensures that it’ll be perfectly smooth and even.My final (narrowest) setting is usually 4 on the KitchenAid pasta roller attachment for things like fettuccine, tagliatelle or pappardelle, or 5 if I want it to be slightly thinner – for example, if I want to make ravioli or tortellini.
Cutting & shaping gluten free pasta:
- Use a sharp knife or the cutting setting on your pasta machine to cut the gluten free pasta sheet into tagliatelle or pappardelle (or other desired pasta shape).
- Dust the pasta with some extra flour, to prevent it from sticking together, and shape it into nests.
Cooking fresh gluten free pasta:
- Cook the fresh gluten free pasta in a pot of salted boiling water for about 4-6 minutes, depending on your preferred texture.
Storing gluten free pasta:
- You can store the pasta in the fridge for up to one day. Make sure that your pasta is generously dusted with flour, to prevent it from sticking to itself, place it into an airtight container, and store it in the fridge.
- For longer storage, you can store it in the freezer for up to one month. Make sure that your pasta is generously dusted with flour, to prevent it from sticking to itself. Arrange the pasta on a lightly floured baking sheet, in a single layer, and freeze it for 1 hour until hardened. Then, transfer it to a freezer (Ziplock) bag and store in the freezer. It’ll usually take about 1-2 minutes longer to cook frozen pasta.
- Note: While you might want to dry your homemade pasta, a word of caution: this pasta dough contains a lot of eggs (and therefore a lot of moisture), and improperly dried and stored pasta can quickly become mouldy. That’s why I recommend either cooking the pasta straight away, or storing it in the fridge or freezer.
