Looking for a dessert that’s both indulgent and packed with protein? This banana pudding recipe has got you covered. By blending cottage cheese with a subtle banana flavor, this treat is easily customizable to fit low-carb and gluten-free diets. Let’s walk through how to make this guilt-free dessert that satisfies your sweet tooth while keeping things nutritious.
Ingredients Breakdown:
- Cottage Cheese: The creamy base of this pudding, cottage cheese adds texture and protein. Opt for 2% low-fat for a balanced, creamy consistency with less fat, or go for full-fat cottage cheese if you prefer a richer flavor.
- Vanilla Protein Powder: Boosts the pudding’s protein content and adds a pleasant sweetness. It’s perfect for a post-workout snack or a midday treat.
- Banana Pudding Mix: Use a cleaner option like Simply Delish Keto Banana Pudding Mix, which delivers the classic banana flavor without the added sugars found in traditional pudding mixes. It’s low-carb friendly too!
- Maple or Sugar-Free Syrup: If carbs aren’t a concern, real maple syrup adds a rich sweetness. For a low-carb version, use a sugar-free syrup, such as Lakanto’s Sugar-Free Maple Syrup.
- Vanilla Extract: Enhances the overall flavor with a layer of sweetness that balances the tang of the cottage cheese.
- Banana (Optional): For a natural sweetness, you can add half a banana. If you’re sticking to low-carb, leave it out or use a small amount of banana extract for the flavor without the carbs.
- Milk of Your Choice: Choose from cream, almond milk, or coconut milk to adjust the pudding’s consistency. All options work well to thin the mixture to your desired texture.
- Wafers: For a traditional touch, use regular wafers or low-carb alternatives like High Key Wafers or Simple Mills Sweet Thins for a gluten-free version.
- Whipped Topping: Optional, but adds a light, fluffy texture. For a dairy-free version, there are plant-based whipped toppings available.
Step-by-Step Directions:
- Blend the Base
Start by adding cottage cheese to a high-speed blender. Since cottage cheese can be lumpy, blend until smooth. Then, mix in the vanilla protein powder, banana pudding mix, maple or sugar-free syrup, and vanilla extract. Blend again until all ingredients are well combined.If the mixture is too thick, gradually add milk (one tablespoon at a time), blending after each addition, until you reach your preferred consistency. Some like it thick and creamy, others prefer a slightly runnier texture. - Assemble the Pudding Cups
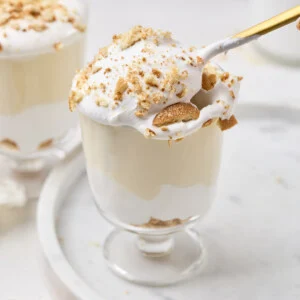
Crush your wafers (either with a food processor or by hand) and layer them at the bottom of each serving cup. Add a layer of whipped topping (if using), then spoon in a generous layer of the banana pudding mixture.Repeat the layers until your cup is filled, finishing with a dollop of whipped topping, a sprinkle of crushed wafers, and a slice of banana (if desired). This not only adds a delightful texture contrast but also makes the dessert visually appealing. - Chill and Serve
Refrigerate your pudding for at least one hour before serving. If making ahead, store in an airtight container for up to 3-4 days. When ready to serve, give it a quick stir to reincorporate any separated ingredients.
Expert Tips:
- Use a High-Speed Blender: To achieve that ultra-smooth, creamy texture, a high-speed blender is a must. A food processor won’t create the same silky consistency, so invest in a good blender for the best results.
- Add Milk Gradually: Be careful when adding milk; too much can turn your pudding runny. Add a little at a time, blending well in between, to control the consistency.
- Adjust Sweetness to Taste: If you prefer a sweeter pudding, you can increase the amount of syrup or protein powder, but keep in mind that more syrup will add carbs.
Dietary Modifications:
- Low-Carb Version: Omit the banana and use low-carb wafers like High Key and sugar-free syrup to keep the carbs in check.
- Gluten-Free Version: This dessert is gluten-free as long as you use a gluten-free wafer brand, such as Simple Mills Sweet Thins.
- Dairy-Free Adaptation: Swap out the cottage cheese for dairy-free yogurt. Use plant-based whipped topping and milk to make the recipe fully dairy-free.
Storing Your Protein Banana Pudding:
Store leftovers in an airtight container in the refrigerator for up to 4 days. Stir before serving, as the pudding may separate slightly. The flavors deepen over time, so making it ahead is a great idea for special occasions!
Common Questions:
- How can I get my pudding extra smooth?
Use a high-speed blender to fully break down the cottage cheese. Blend the ingredients in stages—start with the cottage cheese and milk, then add the rest. - Can I use Greek yogurt instead of cottage cheese?
Yes, you can replace cottage cheese with Greek yogurt in a 1:1 ratio. Keep in mind that Greek yogurt is naturally smoother, so you may need less milk. - How can I make this dessert dairy-free?
Use dairy-free yogurt in place of cottage cheese and choose plant-based whipped topping and milk. You can also opt for gluten-free, dairy-free wafers. - How do I make a low-carb version?
Simply skip the banana, use sugar-free syrup, and pick low-carb wafers like High Key. This cuts down the carb content while still offering a delicious dessert!
Quick and Creamy Banana Pudding Treat
2
10
minutes0
minutes286
kcal10
minutesQuick Protein-Packed Banana Pudding Recipe
Ingredients
2 cups cottage cheese
¼ cup vanilla protein powder
2 ½ tbsp banana pudding mix (Simply Delish)
1-2 tbsp maple syrup or sugar-free syrup
1 tsp vanilla extract
½ banana (optional, omit for low-carb)
For the Topping:
2 tbsp crushed wafers (gluten-free/low-carb options available)
¼ cup whipped topping (optional)
Directions
- Blend the Pudding
Add cottage cheese to a high-speed blender and blend until smooth.
Add protein powder, banana pudding mix, syrup, and vanilla extract. Blend again until fully incorporated.
If the mixture is too thick, gradually add milk until you reach your desired consistency. - Assemble the Pudding Cups
Sprinkle crushed wafers at the bottom of two serving cups.
Add a spoonful of whipped topping, followed by a layer of banana pudding.
Repeat the layers and finish with a dollop of whipped topping and a banana slice (optional). - Chill & Serve
Enjoy immediately or refrigerate for a chilled, creamy treat.
Store leftovers in an airtight container in the fridge for up to 4 days.
Nutrition Facts
2 servings per container
- Amount Per ServingCalories286
- % Daily Value *
- Total Carbohydrate
8g
3%
- Total Sugars 7g
- Protein 40g 80%
- Calcium 237mg 19%
* The % Daily Value tells you how much a nutrient in a serving of food contributes to a daily diet. 2,000 calories a day is used for general nutrition advice.
