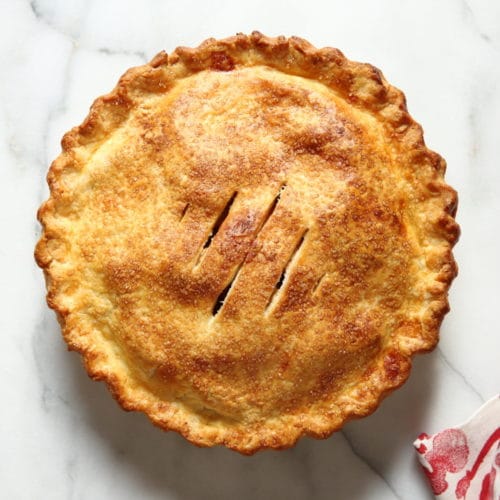
Making a homemade gluten-free pie crust is made simple with my easy recipe (I promise!). It always turns out tender and flaky, with a golden-brown crust perfect for any sweet or savory filling. I use gluten-free pantry staples and basic techniques to create a pliable dough that’s easy to work with and tastes delicious. But if you’re still not convinced, just check out the 5-star reviews—this recipe is a reader favorite! I’ve also included dairy-free, egg-free, and vegan options.
Homemade Gluten-Free Pie Crust
When I first developed this gluten-free pie crust, I gathered inspiration from my trusty Betty Crocker 40th Anniversary Cookbook. The crust in that book was my all-time favorite, and I wanted my gluten-free version to have the same qualities—tender, flaky, buttery, and easy to work with. It took me a few tries to get it how I wanted, but I am so happy with the result (and it is nowhere as difficult as I thought it would be!).
I use gluten-free flour, a little sugar, butter, and shortening to create the best flavor and texture. It’s the perfect crust for my gluten-free turkey pot pie and gluten-free pop tarts, and my family always requests it for special occasions like Thanksgiving and Christmas.
Gluten-Free Pie Crust Recipe
Servings: 8 servings
Prep: 20 minutes
Chilling Time: 1 hour
Total: 1 hour 20 minutes
Ingredients
- 1 ¼ cup all-purpose gluten-free flour with xanthan gum*
- 2 tablespoons granulated sugar
- ¼ teaspoon salt
- ¼ cup unsalted butter, chopped and chilled, for dairy-free/vegan, use Smart Balance butter.
- ¼ cup shortening**, chilled
- ¼ teaspoon apple cider vinegar, You can also use white vinegar.
- 1 large egg, for vegan, use Bob’s Red Mill egg replacer.
- 3 tablespoons ice cold water
Instructions
- In separate small bowls add the chopped butter, shortening, and cold water. Place the bowls in the freezer for a few minutes to get really cold.
- In a large bowl add the gluten-free flour, sugar, salt, chilled butter, chilled shortening, apple cider vinegar, egg (or egg replacer), and ice cold water.
- Using the paddle attachment on a stand-up mixer, mix until fully combined and the dough starts to form. Be sure to scrape the sides of the bowl. The dough will be thick and sticky.
- Shape the dough into a ball. Place the ball on top of a piece of plastic wrap. Press the dough ball into a disc shape. Wrap the dough disc in the plastic wrap and refrigerate for at least 1 hour.
- Remove from the refrigerator and let stand at room temperature for 10-15 minutes.
- Unwrap the dough disc and place it onto parchment paper lightly floured with gluten-free flour. Lightly flour the top of the dough disc and a rolling pin.
- Roll out the dough disc into a 10-12 inch round circle, for a 9-inch pie pan.
- Carefully place the dough into a greased 9-inch pie pan. Press the dough into the bottom and sides (lift the pie crust up and do not try and stretch it). Seal any cracks, if necessary. Shape the sides, fill, and bake as directed in your chosen recipe.
- For a par-baked crust, you can par bake it for 10-15 minutes at 400˚F. Please watch your crust so it doesn’t over bake or get too brown. If par-baking this gluten-free pie crust, you can line the crust with parchment paper and pie weights/dried beans/uncooked rice to stop it from puffing up.
Notes
*I use Pillsbury gluten-free flour or Better Batter gluten-free flour in this recipe. Not all gluten-free flours are created equal. You may experience different baking results depending on the gluten-free flour blend you choose.
**Please don’t substitute using extra butter for the shortening. Shortening is key to maintaining the moisture of the dough.
Nutrition
Serving: 1 serving Calories: 182kcal Carbohydrates: 16g Protein: 1g Fat: 12g Saturated Fat: 5g Cholesterol: 15mg Sodium: 129mg Fiber: 2g Sugar: 3g Vitamin A: 175IU Calcium: 14mg Iron: 0.7mg
Serving Suggestions
This easy gluten-free crust recipe has replaced all store-bought dough or frozen pie crusts in my house. I always use it at Thanksgiving to make my easy gluten-free apple pie and pecan pie recipes! My husband also loves it as the crust for my homemade gluten-free quiche (I don’t add any sugar to the crust when making it for savory dishes like this). But honestly, I can’t think of any tart, pie, or galette this crust wouldn’t work for!
Storage Instructions
You can easily make this ahead of time. I’ve done this many times, and it’s really helpful over the busy holiday season. You can store the dough disc (wrapped in plastic) in the refrigerator for up to three days. Don’t forget to let it sit at room temperature for 10-15 minutes before rolling.
To freeze, once the dough disk is wrapped in plastic wrap, place it in a plastic freezer bag and freeze for up to 3 months. Defrost the in the refrigerator overnight and let it sit out for 10-15 minutes before rolling.
