-
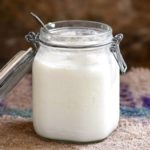
Making yogurt at home is much simpler than it sounds, and you don’t need a yogurt maker or special culture to achieve a thick and creamy bowl of yogurt. Not only is homemade yogurt incredibly cost-effective, but it’s also a great source of probiotics, which are beneficial for gut health.
Preparation Time
- Prep Time: 20 minutes
- Cook Time: 4 hours
- Total Time: 4 hours 20 minutes
Ingredients
- 2 cups milk (see notes)
- 2 tablespoons plain yogurt with live cultures
- Optional: 2 tablespoons skim milk powder (for added creaminess and protein)
Instructions
- Heat the Milk:
Begin by heating the milk slowly on the stove. Bring it to 180°F (80°C), whisking occasionally to prevent the milk from scorching on the bottom of the pot. This step is important as heating the milk helps denature the whey proteins, resulting in thicker yogurt. If you skip this step, your yogurt may not be as thick, but it will still work. - Add Skim Milk Powder (Optional):
If you prefer richer, creamier yogurt, you can whisk in 2 tablespoons of skim milk powder while the milk is heating. This step is optional, but it adds extra protein and helps achieve a creamier texture. - Cool the Milk:
After the milk has reached 180°F, remove it from the heat and allow it to cool to 105°F (40°C). If you don’t have a thermometer, you can let the milk cool until it’s just above room temperature and still be fine. - Stir in the Yogurt Culture:
Once the milk has cooled, stir in 2 tablespoons of plain yogurt that contains live active cultures. If you’re using store-bought yogurt, you may want to add up to 4 tablespoons, as store-bought varieties often have weaker cultures. Stir gently to mix the culture evenly throughout the milk. - Set the Yogurt:
Pour the milk into a glass jar or container. Cover it with a lid or cloth, and place it in a warm environment to maintain a temperature of about 110°F (40°C). This can be done in an oven with the light on, in a cooler, or even in a warm spot in the kitchen. Let the yogurt sit for at least 2 hours. The longer it sits, the thicker and more tangy it will become. For a very sour yogurt, you can let it sit for up to 24 hours. - Refrigerate and Thicken:
Once the yogurt has reached a pudding-like consistency, transfer it to the refrigerator. It will continue to thicken as it cools and settle into the creamy texture you’re looking for.
Notes and Tips:
- Without a Thermometer:
If you don’t have a thermometer, heat the milk until it’s frothy and then cool it to just above room temperature before adding the culture. However, for best results and to achieve thick yogurt, a thermometer is highly recommended. - Types of Milk:
You can use any type of milk—raw milk, goat’s milk, or cow’s milk. However, be aware that UHT (ultra-heat-treated) milk may not thicken as expected. - Flavor Your Yogurt:
Once your yogurt is made, you can flavor it however you like—add jam, fresh fruit, vanilla, or cinnamon! Just be sure not to add these flavors before culturing, as it can interfere with the fermentation process. - For Cream-Top Yogurt:
If you prefer cream-top yogurt, use non-homogenized milk. If non-homogenized milk is unavailable, you can add a few tablespoons of cream to the top of the jar before starting the fermentation process. This will give you a similar result, though it won’t be quite the same.
Turning Homemade Yogurt into Greek Yogurt or Yogurt Cheese:
If you prefer thicker Greek yogurt or yogurt cheese, simply strain the yogurt after it’s made using a fine mesh strainer or cheesecloth. This removes the whey and results in a denser, creamier consistency.
With this easy process, you can enjoy fresh, homemade yogurt anytime—without the need for special equipment or expensive store-bought varieties. Happy yogurt-making!
